Friday, September 20, 2013

Beg. Ceramics: Slab Boxes Tutorial


Wedge clay
Flatten the clay on the slab roller and roll it out into a thin slab

Place the template on your slab and cut around

For the square box, cut out 6 square slabs

Place a ruler 1/4" from the edge
Hold a wooden knife at a 45º angle to create a bevel cut.  Do not cut all in one stroke!  Score the clay several times before cutting all the way through.
Cut a bevel edge on all 4 sides

Repeat for all 6 squares
Let your slabs dry to leather hard.  Cover them loosely and let them stiffen overnight.  If there is space, place them on plaster to dry them out faster.
When the slabs are leather hard, score & slip together


With each connection, add a thin coil on the inside of the corner

Smooth out the coil

Using the end of a paintbrush may help you smooth the coil, especially once you have more of the box formed

When you have 5 slabs slipped & scored together, tap the corners with a wooden tool to compress the seams

If the lip of the box is uneven, use a utility knife to trim - be careful to maintain the 45º angle.  Smooth out the lip.

Smooth out the lid and attach a handle

Complete!


Thursday, September 19, 2013

Art Fundies: Composition Sketches


Now that you have finished your complex object sketches and broken down your object into the most simple shapes, you will create compositional sketches using these shapes that illustrate specific design principles.
Divide your paper into twelve 4"x4" squares.  Write  your 3 principles at the top of the columns.  For each principle, you will design 4 different compositions using the shapes from your complex object.
This is the original complex object sketch broken down into its basic shapes 
Try to find the original shapes that were used to create these compositions.  Notice that some of the shapes have been altered, varied, or multiplied.


Monday, September 16, 2013

Art Fundies: Fine Art Analysis

1. Pick 1 principle of design
Balance - A way of keeping a sense of stability or equilibrium in an artwork by how you distribute visual weight (symmetrical, asymmetrical, or radial)

Unity - Harmony; a sense of oneness or wholeness in the work of art.  The arrangement of shapes, and how they relate to each other create a sense of unity


Emphasis - Focal point; where the focus is concentrated through design principles or meaning (size, shape, contrasting color, etc.).  The element that is most important in your design dominates or pulls the viewer's eyes towards it.


Contrast - Art elements in opposition, both subtle and intense.  For example, light areas in contrast to dark, or highly textured areas versus smooth areas.


Pattern - The repetition of similar elements (such as shapes, lines, color, sequences, etc.) at precise intervals.  Pattern is more exact than rhythm.


Movement - The illusion of activity or speed in a composition through the use of line or perspective, or a sense of actual movement on the page (things falling, rising, turning); a way of combining elements to cause the viewer's eye to move over the artwork in a specific direction.


Rhythm - A visual complement to musical rhythm.  A sense of pattern or flow is woven throughout the work of art.  Elements, such as lines or shapes, are repeated at regular intervals.


Proportion - The relative sizes and locations of objects in the artwork.  It refers to the relationships of the size of objects in a body of work.


Perspective - The representation of space on a two-dimensional surface to give the illusion of depth and distance.  The spatial relation of objects as they might appear to the eye.


Variety - The quality or state of having different forms or types.


2. Find one piece of fine art (that you like!) that best illustrates the principle that you have chosen.
Use the links below to help guide you in your search


3.  Blog post: Fine Art Analysis
Write a short analysis.  This should be well written with proper grammar, complete sentences, and thoughtful explanations.  

     Why did you choose this piece of art?  What do you like about it?
     Describe the specific elements of art used. (Line, shape, form, color, value, space, texture)
     How did the artist use the elements of art the achieve the specific design principle you chose?


Example:

Unity


Henri Toulouse Lautrec
M. de Lauradour, 1897
Oil and gouache on cardboard

I chose this piece of art because I was initially fascinated that a painter used cardboard to create such a beautiful piece.  I love how art can be made with any material.  Henri Toulouse Lautrec proves that even the simplest of materials can be made into works of art.  I find myself attracted to portraits and sketches that have evidence of mark making and mistakes, and that show the process of the working artist.  He uses line to create texture throughout the piece.  This style of mark making helps to unify the composition.  The entire painting has a hurried feel like the artist worked very fast on the canvas.  Although the background is lacking in much detail, there is a sense of space and that the model is sitting in a room.  The colors of the background are subdued so that the attention is focused on the model.  However, the colors of the man's beard and pants can be found in the background, thus emphasizing unity. 

Ugly Face Jugs in the kiln!

The Advanced Ceramics students have finished the construction of their Ugly Face Jugs! 


Tuesday, September 10, 2013

Art Fundies: Complex Object Sketch

Bring in a complex object from home that has at least 4 different parts.  Items such as a pencil, wire whisk, or pinecone would not be acceptable.  Pictured below are good examples of complex objects.


First, sketch the entire object - use up the entire page!  Remember to use light pressure with your pencil.  Start with general shapes and slowly add detail to the drawing until you have an accurate outline.  Each part of the object should be clearly defined.  If you have time, add shading to the drawing.


Second, draw the individual parts.  Again, use light pencil pressure at first, start with general shapes, slowly adding detail until you have an accurate outline of each part.


Ceramics: Ugly Face Jugs

Students will learn about the 
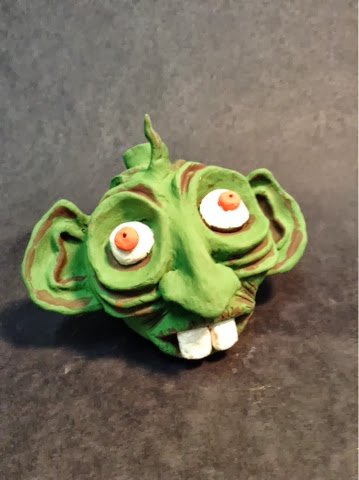
history of ugly face jugs in African American culture.  After learning how to make pinch pots, students attach 2 pinch pots together to create a head.  Focusing on emphasis, texture, and expression, students add features to the head to sculpt a dynamic and exciting ugly face.  They have the option of making it into a vessel by adding a spout or a lid.


How to make an Ugly Face Jug

Make 2 pinch pots equal in size

Score both pinch pots

Apply slip to one pinch pot

Place on pinch pot on top of the other

Blend the clay so there is no seam

Push into the head where you want the eye sockets and cheek bones

Roll 2 pieces of clay in your hands to form eye balls

Score & slip the eyeballs in the eye sockets

Roll out 4 coils

Score & slip the 4 coils around the eyes for eye lids

Blend the coils into the face
Play with the shape of the eyelids to create different expressions

Roll 2 more balls and 1 triangle

Score & slip the 2 balls on either side of the triangle to create the nose

Score & slip the nose onto the face

Blend the nose into the face to erase the seams
Pick his nose to create nostrils!

Form teeth

Score & slip the teeth onto the face

Roll out 2 coils for the lips

Score & slip the lips over the teeth

Blend the lips to erase the seam

Use the other end of the needle tool to make indents in the eyes for irises

To make the spout: 
Roll out a slab

With a ruler and a knife...

Cut it into a long rectangle

Form it into a tube and blend the seam

Decide where you want the spout and cut a hole

Score & slip the spout to the head

Add a coil to reinforce the spout

Blend the seam

Using a paintbrush and water, smooth out the surface of the jug

Add texture!


For the complete lesson plan: Ugly Face Jugs