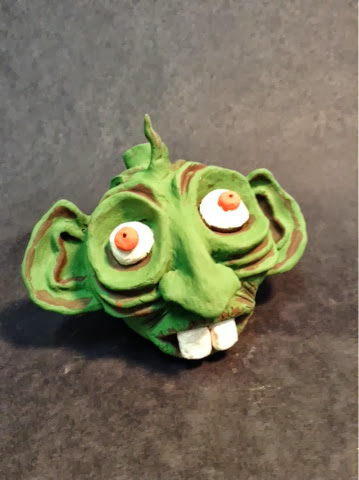
Post a picture of your finished Punk Head AND a picture of the second grader's painting that inspired you work. Click here to find images of the band members.
Describe the original band member. What does he/she/it play? What do you think its character is like?
How did the band member painting inspire your Punk Head. Did you embellish upon the original design?
In terms of craftsmanship, how successful is your piece? Is everything smoothed out? Is it constructed well? Is it interesting from all angles? How did you decide to glaze it?
Showing posts with label pinch pot. Show all posts
Showing posts with label pinch pot. Show all posts
Friday, April 11, 2014

Tuesday, March 18, 2014
Pinch Pot Evaluation
Attach a picture of your finished pinch pot.
1. CRAFTSMANSHIP: Is your project will made? (All cracks smoothed out, consistent wall thickness, no heavy bottom?) What technical difficulties did you have in putting it together? Did you include a foot and one other applied clay feature (i.e. a handle, lip)?
2. DESIGN QUALITY: Were your design ideas original and imaginative? How did you create texture?
3. EFFORT/AMBITION: Did you work hard? Did you go beyond the basic requirements of the assignments (explain)?
4. Any other thoughts?
5. Grade yourself for EFFORT ___/10
VISUAL SUCCESS ___/10
Friday, March 7, 2014
Punk Heads
 |
| Punk Farm by Jarrett J. Krosoczka |
The Beginning Ceramics students are teaming up with students from Pond Cove! The elementary school students are reading Punk Farm and creating artwork inspired by the book. Punk Farm is about a group of farm animals that create a punk band and rock out while the farmer is in bed! The second graders painted their own original punk rocker. My ceramic students are taking these paintings and creating a punk head inspired by the paintings:

DECIDE: Choose a 2nd grader's band member

OBSERVE: Sketch the band member.
 |
DRAW: Design your Punk Head
- Start with an egg shape for the head
- Be inspired by the band member, do not duplicate

CREATE: Make 2 pinch pots equal in size and attach them together at the mouths. Create the skeleton first: make indents for the eye sockets, under the cheekbones, and mouth. Sculpt clay and attach to clay head. Work in layers: i.e. attach eyeballs first and then eyelids; attach teeth before lips.

Friday, October 18, 2013
Ceramics: Ugly Face Jugs Evaluation
1. Post a picture of your ugly face jug.
2. CRAFTSMANSHIP: Is your project well made? What technical difficulties did you have in creating it? Is your jug free of cracks and burrs? Is everything smoothed out? What technique would you like to work on for the next project?
3. DESIGN QUALITY: Is your design for the ugly face jug visually interesting and original? Does the face show a dynamic expression? Are the features of the face exaggerated? Is the jug aesthetically interesting from all angles?
4. EFFORT/AMBITION: Did you work hard? Did you go beyond the basic requirements of the assignment?
Grade yourself:
EFFORT ___/10
VISUAL SUCCESS ___/10
 |
| Kia's ugly face jug |
2. CRAFTSMANSHIP: Is your project well made? What technical difficulties did you have in creating it? Is your jug free of cracks and burrs? Is everything smoothed out? What technique would you like to work on for the next project?
3. DESIGN QUALITY: Is your design for the ugly face jug visually interesting and original? Does the face show a dynamic expression? Are the features of the face exaggerated? Is the jug aesthetically interesting from all angles?
4. EFFORT/AMBITION: Did you work hard? Did you go beyond the basic requirements of the assignment?
Grade yourself:
EFFORT ___/10
VISUAL SUCCESS ___/10
TOPIC
|
OBJECTIVE
|
POINTS
|
CLASS TIME
|
I was engaged in the lesson during class time and was aware of the objectives (effort)
|
5
|
I used the clay and clay tools responsibly and respectfully at all times (behavior) and helped clean up at the end of class
|
5
|
|
DESIGN
|
The face successfully shows a dynamic expression
|
20
|
The features of the face are exaggerated
|
15
|
|
My design is original, unique, and interesting to look at
|
20
|
|
TECHNIQUE
|
I carefully formed and connected 2 pinch pots
|
5
|
The jug has been smoothed out and looks finished
|
10
|
|
Glaze has been carefully applied
|
10
|
|
BLOG POST
|
I included an image of my finished ugly face jug
|
5
|
I carefully answered all the questions from the evaluation
|
5
|
|
TOTAL
|
100
|
Tuesday, September 24, 2013




Wednesday, September 18, 2013


Monday, September 16, 2013
Ugly Face Jugs in the kiln!
The Advanced Ceramics students have finished the construction of their Ugly Face Jugs!


Tuesday, September 10, 2013
Ceramics: Ugly Face Jugs
Students will learn about the history of ugly face jugs in African American culture. After learning how to make pinch pots, students attach 2 pinch pots together to create a head. Focusing on emphasis, texture, and expression, students add features to the head to sculpt a dynamic and exciting ugly face. They have the option of making it into a vessel by adding a spout or a lid.


How to make an Ugly Face Jug
Make 2 pinch pots equal in size
Score both pinch pots
Apply slip to one pinch pot
Place on pinch pot on top of the other
Blend the clay so there is no seam
Push into the head where you want the eye sockets and cheek bones
Roll 2 pieces of clay in your hands to form eye balls
Score & slip the eyeballs in the eye sockets
Roll out 4 coils
Score & slip the 4 coils around the eyes for eye lids
Blend the coils into the face
Play with the shape of the eyelids to create different expressions
Roll 2 more balls and 1 triangle
Score & slip the 2 balls on either side of the triangle to create the nose
Score & slip the nose onto the face
Blend the nose into the face to erase the seams
Pick his nose to create nostrils!
Form teeth
Score & slip the teeth onto the face
Roll out 2 coils for the lips
Score & slip the lips over the teeth
Blend the lips to erase the seam
Use the other end of the needle tool to make indents in the eyes for irises
To make the spout:
Roll out a slab
With a ruler and a knife...
Cut it into a long rectangle
Form it into a tube and blend the seam
Decide where you want the spout and cut a hole
Score & slip the spout to the head
Add a coil to reinforce the spout
Blend the seam
Using a paintbrush and water, smooth out the surface of the jug
Add texture!
For the complete lesson plan: Ugly Face Jugs
Subscribe to:
Posts (Atom)